Building Agent Systems with A2A Outbound Adapter
The A2A Outbound Adapter is the easiest and most robust way to connect your uAgent-based agents to the broader A2A ecosystem. By using the adapter, you can:
- Achieve Interoperability: Seamlessly connect agents built on different frameworks, or platforms, regardless of where they are hosted.
- Enable Agent-to-Agent Collaboration: Allow your agents to discover, communicate, and collaborate with other agents in real time, unlocking new workflows and capabilities.
- Abstract Complexity: The adapter handles protocol details, health checks, routing, and error handling, so you can focus on your agent’s logic and value.
- Scale Easily: Add, remove, or update agents at runtime without changing your core infrastructure.
- Future-Proof Your Agents: Adopt open standards and modular design, ensuring your agents remain compatible as the ecosystem evolves.
Whether you are building a single specialized agent or a large-scale multi-agent system, the A2A Outbound Adapter provides the foundation for secure, scalable, and innovative agentic applications.
Features
Agent Management
- Configure and manage multiple A2A agents with different specialties
- Automatic agent discovery and registration
- Health monitoring and status tracking
- Registers Agent Cards for multiple A2A servers and runs them alongside the uAgent in a single terminal using different ports
- Supports communication with both single and multiple A2A servers
- Dynamically determines the appropriate A2A server based on the user query, sends the request via HTTP, and returns the response back to ASI:One
Intelligent Routing
- Keyword Matching: Route queries based on agent keywords and specialties
- LLM-Based Routing: Use AI to intelligently select the best agent for complex queries
- Round-Robin: Distribute load evenly across available agents
- Priority-Based: Assign priorities to agents for preferential routing
Communication Protocols
- Full uAgent chat protocol support
- Asynchronous message handling
- Acknowledgment and error handling
- Real-time agent communication
Reliability Features
- Health checking and agent discovery
- Fallback executor support
- Graceful error handling
- Timeout management
Installation
pip install "uagents-adapter[a2a-outbound]==0.6.2"
Class Reference
A2AAdapter
Main adapter class for managing A2A agents.
Constructor Parameters
| Parameter | Type | Default | Description |
|---|---|---|---|
name | str | Required | Name of the adapter |
description | str | Required | Description of the adapter |
asi_api_key | str | Required | ASI:One API Keys |
port | int | 8000 | uAgent port |
mailbox | bool | True | Enable mailbox functionality |
seed | str | None | Seed for uAgent (auto-generated if None) |
agent_configs | List[A2AAgentConfig] | [] | List of agent configurations |
fallback_executor | AgentExecutor | None | Fallback executor for unrouted queries |
routing_strategy | str | "keyword_match" | Routing strategy to use |
Methods
add_agent_config(config: A2AAgentConfig)
Add a new agent configuration to the adapter.
run()
Start the adapter and begin processing messages.
A2AAgentConfig
Configuration class for individual A2A agents.
Constructor Parameters
| Parameter | Type | Default | Description |
|---|---|---|---|
name | str | Required | Agent name |
description | str | Required | Agent description |
url | str | Required | Agent URL |
port | int | Required | Agent port |
specialties | List[str] | Required | Agent specialties |
skills | List[str] | Auto-generated | Agent skills |
examples | List[str] | Auto-generated | Usage examples |
keywords | List[str] | Auto-generated | Routing keywords |
priority | int | 1 | Agent priority (higher = preferred) |
Components
1. A2AAgentConfig
A dataclass for configuring each agent, including name, description, URL, specialties, skills, and routing metadata.
class A2AAgentConfig:
    """Configuration for an A2A agent (name, description, URL, specialties, etc.)."""
Example: Writing an Agent Config
A2AAgentConfig(
    name="research_specialist",
    description="AI Research Specialist for research and analysis",
    port=8100,
    a2a_port=10020,
    specialties=["research", "analysis", "fact-finding", "summarization"],
    executor_class="ResearchAgentExecutor"
)
2. SingleA2AAdapter
Wraps a single uAgent and exposes it as an A2A HTTP server. Handles incoming chat messages, forwards them to the agent, and returns responses. Supports direct execution fallback if HTTP endpoints are unavailable.
class SingleA2AAdapter:
    """Expose a single uAgent as an A2A HTTP server with fallback support."""
3. MultiA2AAdapter
Manages multiple agent configurations. Discovers and health-checks available agents at runtime. Routes queries to the best agent using keyword matching, round-robin, or LLM-based strategies. Provides fallback execution if no agent matches.
class MultiA2AAdapter:
    """Manage and route between multiple A2A agent configs with advanced strategies."""
4. a2a_servers
Starts one or more A2A agent servers, each with its own manifest and port. This function is used to launch the HTTP servers for your agents, making them discoverable and accessible via the A2A protocol.
Function:
def a2a_servers(agent_configs: List[A2AAgentConfig], executors: Dict[str, AgentExecutor]):
    """Start individual A2A servers for each agent config and executor in separate threads."""
AgentCard Creation
How AgentCard Content is Created and Used
-
A2AAgentConfig
- This dataclass is where you define the agent's core metadata:
name: The agent's unique name (e.g., "research_specialist").description: A human-readable summary of what the agent does (e.g., "AI Research Specialist for research and analysis").urlandport: Where the agent's HTTP server will be accessible.specialties: List of topics or domains the agent is good at (e.g.,["research", "analysis"]).skills,examples,keywords,priority: Optional fields for routing and discovery. If not provided, they are auto-generated from specialties.
- How to write:
- Use clear, concise, and descriptive text for
nameanddescription. - List all relevant specialties for accurate routing.
- Use clear, concise, and descriptive text for
- This dataclass is where you define the agent's core metadata:
-
Agent Executor
- The executor (e.g.,
ResearchAgentExecutor) is the logic that processes queries. It receives the config and uses its fields to:- Set up prompts, system messages, or capabilities.
- Inform the agent's behavior and response style.
- The executor (e.g.,
-
Agent Skill (AgentSkill)
- Created using the config's fields:
id,name,description,tags(from specialties), andexamples.
- How to write:
id: Usually a lowercase, underscored version of the name.tags: Use specialties for discoverability.examples: Short sample queries or tasks.
- Created using the config's fields:
-
Agent Card (AgentCard)
- Combines all the above into a manifest for the A2A server:
name,description,a2a_port,version,defaultInputModes,defaultOutputModes,capabilities,skills(list of AgentSkill).
- This card is served at
/.well-known/agent.jsonand is what platforms like AgentVerse use to discover and display your agent. - How to write:
- Ensure all fields are filled and accurate.
defaultInputModes/defaultOutputModesshould include "text" for chat.capabilitiescan be left empty or set as needed.
- Combines all the above into a manifest for the A2A server:
-
A2A HTTP Server (A2AStarletteApplication)
- Uses the AgentCard to expose the agent over HTTP.
- The manifest is automatically generated from the AgentCard.
-
uAgent (MultiA2AAdapter/SingleA2AAdapter)
- Handles chat protocol and routes queries to the correct A2A server based on the agent card.
Example: AgentCard JSON Manifest
Below is an example of what an AgentCard manifest looks like when served at /.well-known/agent.json
{
  "capabilities": {},
  "defaultInputModes": [
    "text"
  ],
  "defaultOutputModes": [
    "text"
  ],
  "description": "AI Research Specialist for research and analysis",
  "name": "Research_Specialist",
  "protocolVersion": "0.2.5",
  "skills": [
    {
      "description": "AI Research Specialist for research and analysis",
      "id": "research_specialist_skill",
      "name": "Research_Specialist",
      "tags": [
        "research",
        "analysis",
        "fact-finding",
        "summarization"
      ]
    }
  ],
  "url": "http://localhost:10020/",
  "version": "1.0.0"
}
File Structure
SingleA2AAdapter: For exposing a single agent as A2A.MultiA2AAdapter: For managing and routing between multiple agents.A2AAgentConfig: Agent configuration and metadata.
Agent Setup
- Add new agents by appending to
agent_configs. - Change routing by setting
routing_strategytokeyword_match,round_robin, orllm. - Customize health checks or fallback logic as needed.
Coordinator Example for Multi-Agent
Note: This coordinator is for multi-agent setups.
def create_coordinator(self):
    print("Creating Coordinator...")
    self.coordinator = MultiA2AAdapter(
        name="MultiAgent",
        description="Routes queries to AI specialists",
        llm_api_key="your_llm_api_key",           # LLM API key (default: ASI1 API key)
        base_url="your_llm_base_url",             # LLM base URL (default: ASI1 endpoint)
        model="your_llm_model",                   # LLM model name (default: asi1i)
        port=8200,
        mailbox=True,
        agent_configs=self.agent_configs,
        routing_strategy="keyword_match"
    )
    print("Coordinator created!")
    return self.coordinator
Architecture
Below is a high-level diagram of the A2A Adapter architecture:
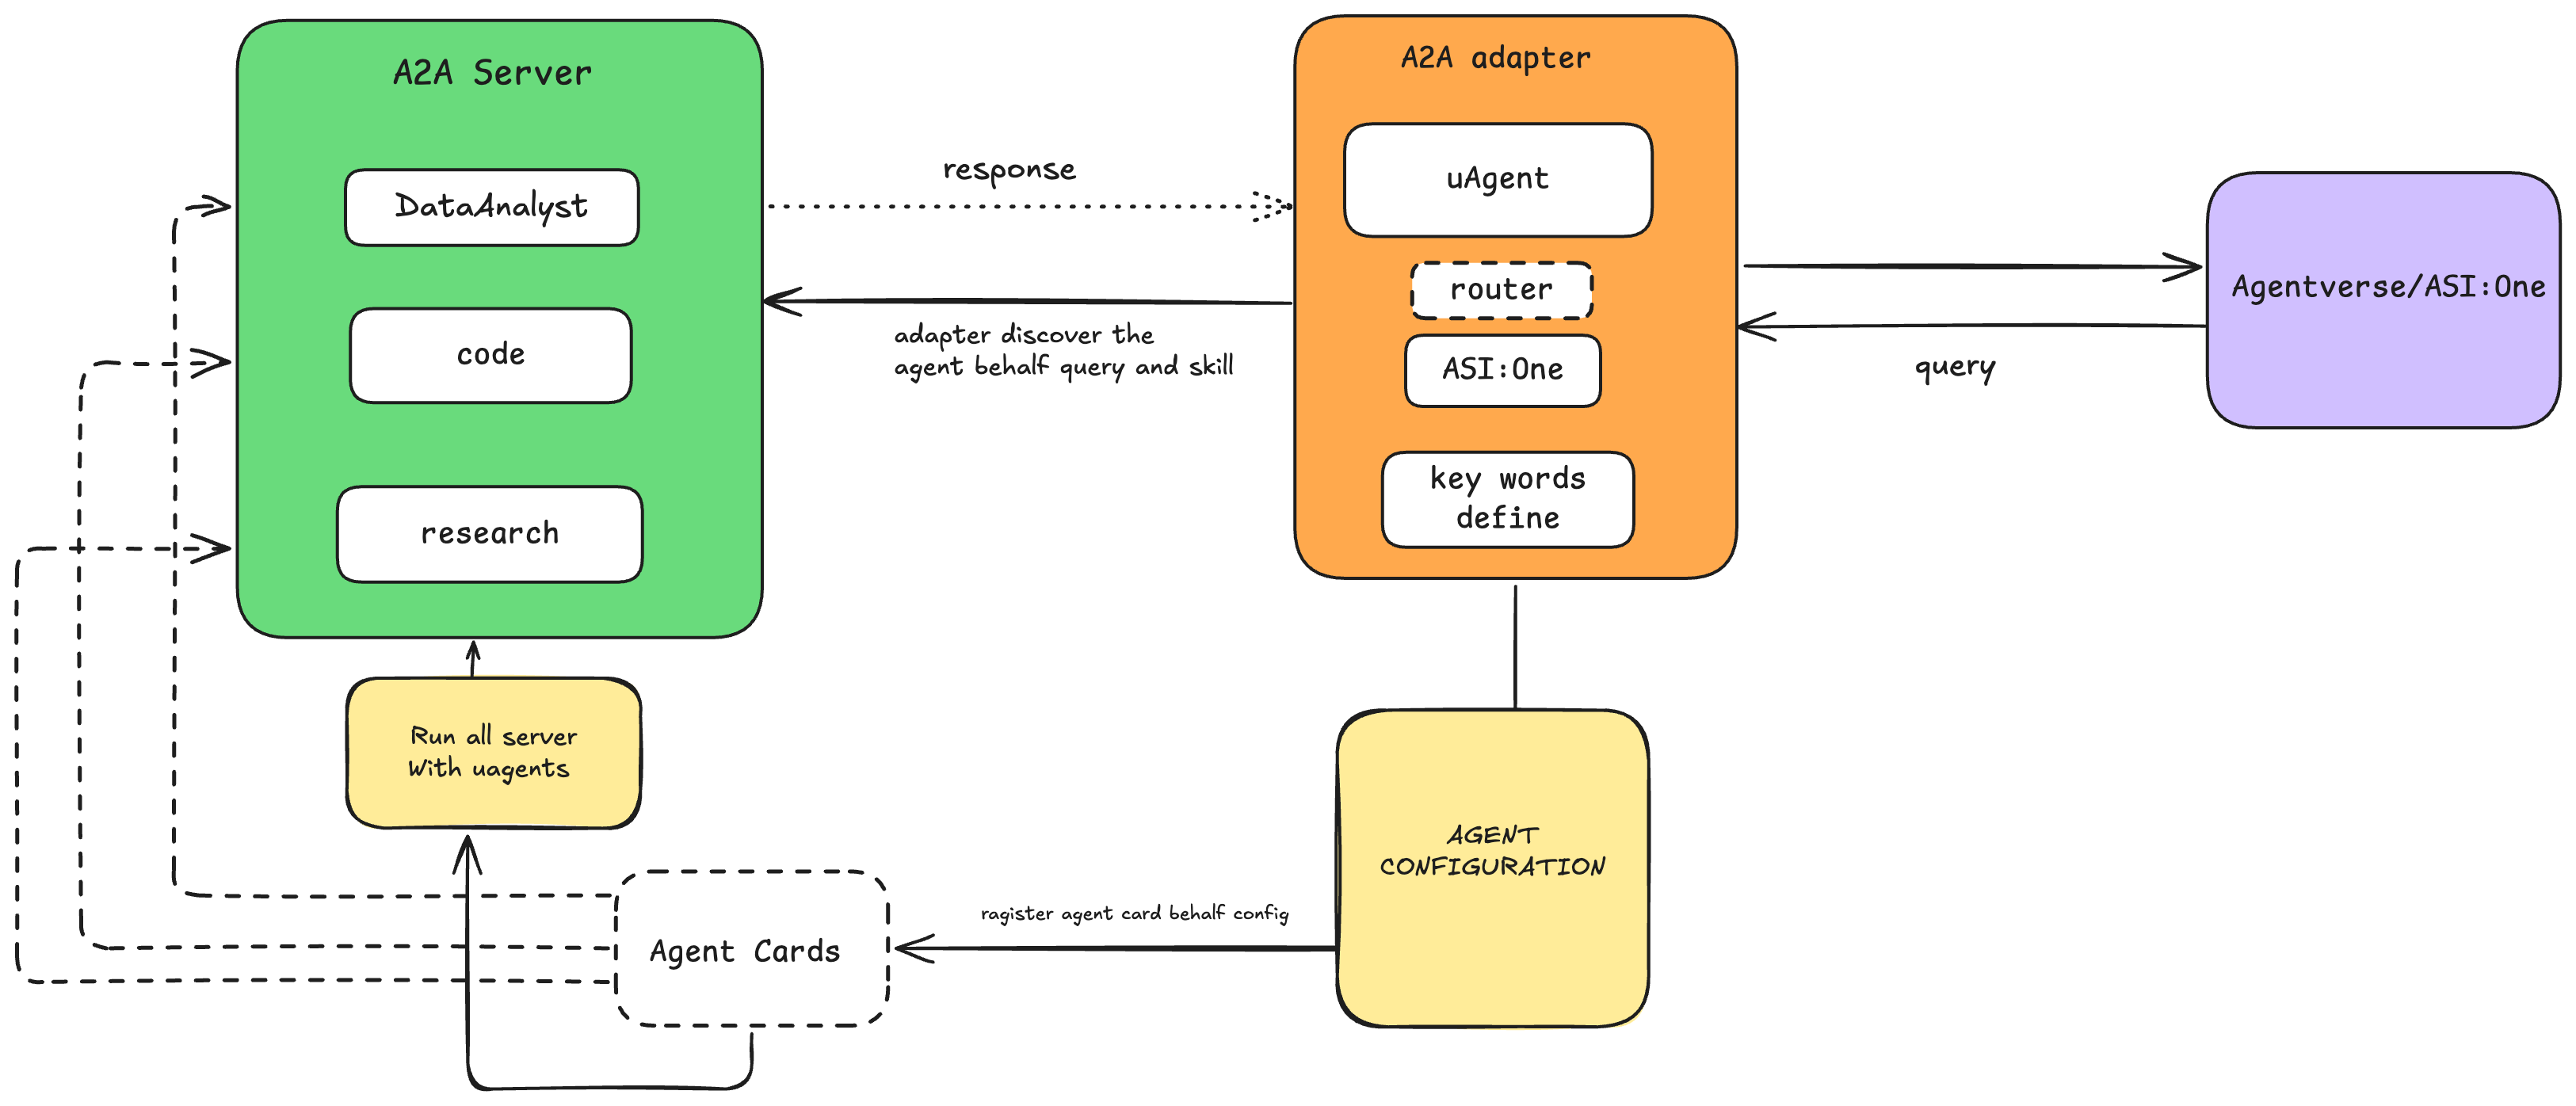
Message Flow
- User sends a message to the uAgent (via chat protocol).
- Adapter receives the message and determines the best agent to handle it (using routing strategies).
- Adapter forwards the message to the selected A2A agent's HTTP endpoint.
- A2A agent processes the message and returns a response.
- Adapter relays the response back to the original sender.
- Acknowledgement is sent for message delivery.
Routing Strategies
- Keyword Match: Scores agents based on keyword, specialty, and skill overlap with the query.
- Round Robin: Rotates through available agents.
- LLM Routing: Uses a language model to select the best agent based on query and agent descriptions.
Fallback
If no agent matches, or if all endpoints fail, the adapter can call a fallback executor directly (if provided).
Example Usage
Full System Example: SingleAgent Coordinator
This example shows how to set up a full system with a single Brave Search agent, including both the A2A HTTP server and the uAgent coordinator.
from typing import Dict, List
from uagents_adapter import SingleA2AAdapter, A2AAgentConfig, a2a_servers
from brave.agent import BraveSearchAgentExecutor

class BraveSearchAgent:
    def __init__(self):
        self.coordinator = None
        self.agent_configs: List[A2AAgentConfig] = []
        self.executors: Dict[str, any] = {}
        self.running = False

    def setup_agents(self):
        print("🔧 Setting up Brave Search Agent")
        self.agent_configs = [
            A2AAgentConfig(
                name="brave_search_specialist",
                description="AI Agent for web and news search using Brave Search API",
                url="http://localhost:10020",
                port=10020,
                specialties=["web search", "news", "information retrieval", "local business", "site-specific lookup"],
                priority=3
            )
        ]
        self.executors = {
            "brave_search_specialist": BraveSearchAgentExecutor()
        }
        print("✅ Brave Search Agent configuration created")

    def start_individual_a2a_servers(self):
        print("🔄 Starting Brave Search server...")
        a2a_servers(self.agent_configs, self.executors)
        print("✅ Brave Search server started!")

    def create_coordinator(self):
        print("🤖 Creating Brave Coordinator...")
        # Use a valid agent_executor, e.g., the BraveSearchAgentExecutor or a coordinator logic
        brave_executor = self.executors.get("brave_search_specialist")
        if brave_executor is None:
            raise ValueError("BraveSearchAgentExecutor not found in executors dictionary.")
        self.coordinator = SingleA2AAdapter(
            agent_executor=brave_executor,
            name="brave_agent",
            description="Coordinator for routing Brave Search queries",
            port=8200,
            mailbox=True
        )
        print("✅ Brave Coordinator created!")
        return self.coordinator

    def start_system(self):
        print("🚀 Starting Brave Search System")
        try:
            self.setup_agents()
            self.start_individual_a2a_servers()
            coordinator = self.create_coordinator()
            self.running = True
            print(f"🎯 Starting Brave coordinator on port {coordinator.port}...")
            coordinator.run()
        except KeyboardInterrupt:
            print("👋 Shutting down Brave Search system...")
            self.running = False
        except Exception as e:
            print(f"❌ Error: {e}")
            self.running = False

def main():
    try:
        system = BraveSearchAgent()
        system.start_system()
    except KeyboardInterrupt:
        print("👋 Brave system shutdown complete!")
    except Exception as e:
        print(f"❌ Error: {e}")

if __name__ == "__main__":
    main()
Getting Started: Brave Search Agent with A2A Adapter
1. Clone the Repository
Clone the innovation-lab-examples repository or navigate to your project directory.
2. Install Dependencies
pip install "uagents-adapter[a2a-outbond]"
Or use the provided requirements.txt if available:
pip install -r requirements.txt
3. Set Up Environment Variables
Obtain a Brave Search API key from Brave Search API.
Create a .env file in your project directory with:
BRAVE_API_KEY=your_brave_api_key_here
4. Run the Brave Search Agent
The main entry point for running the Brave Search Agent is main.py.
python main.py
This will:
- Start the Brave Search A2A server (default: http://localhost:10020)
- Start a coordinator agent for routing queries
- Print manifest URLs after startup
5. Inspector and Manifest Links
- After startup, you can inspect your agent at:
- Manifest:
http://localhost:10020/.well-known/agent.json - Coordinator Inspector: AgentVerse Inspector
- Manifest:
6. Interacting with Your Agent
Check the inspector link from the agent output and go to the agent profile, or directly in your local agents look for the Brave Search agent.
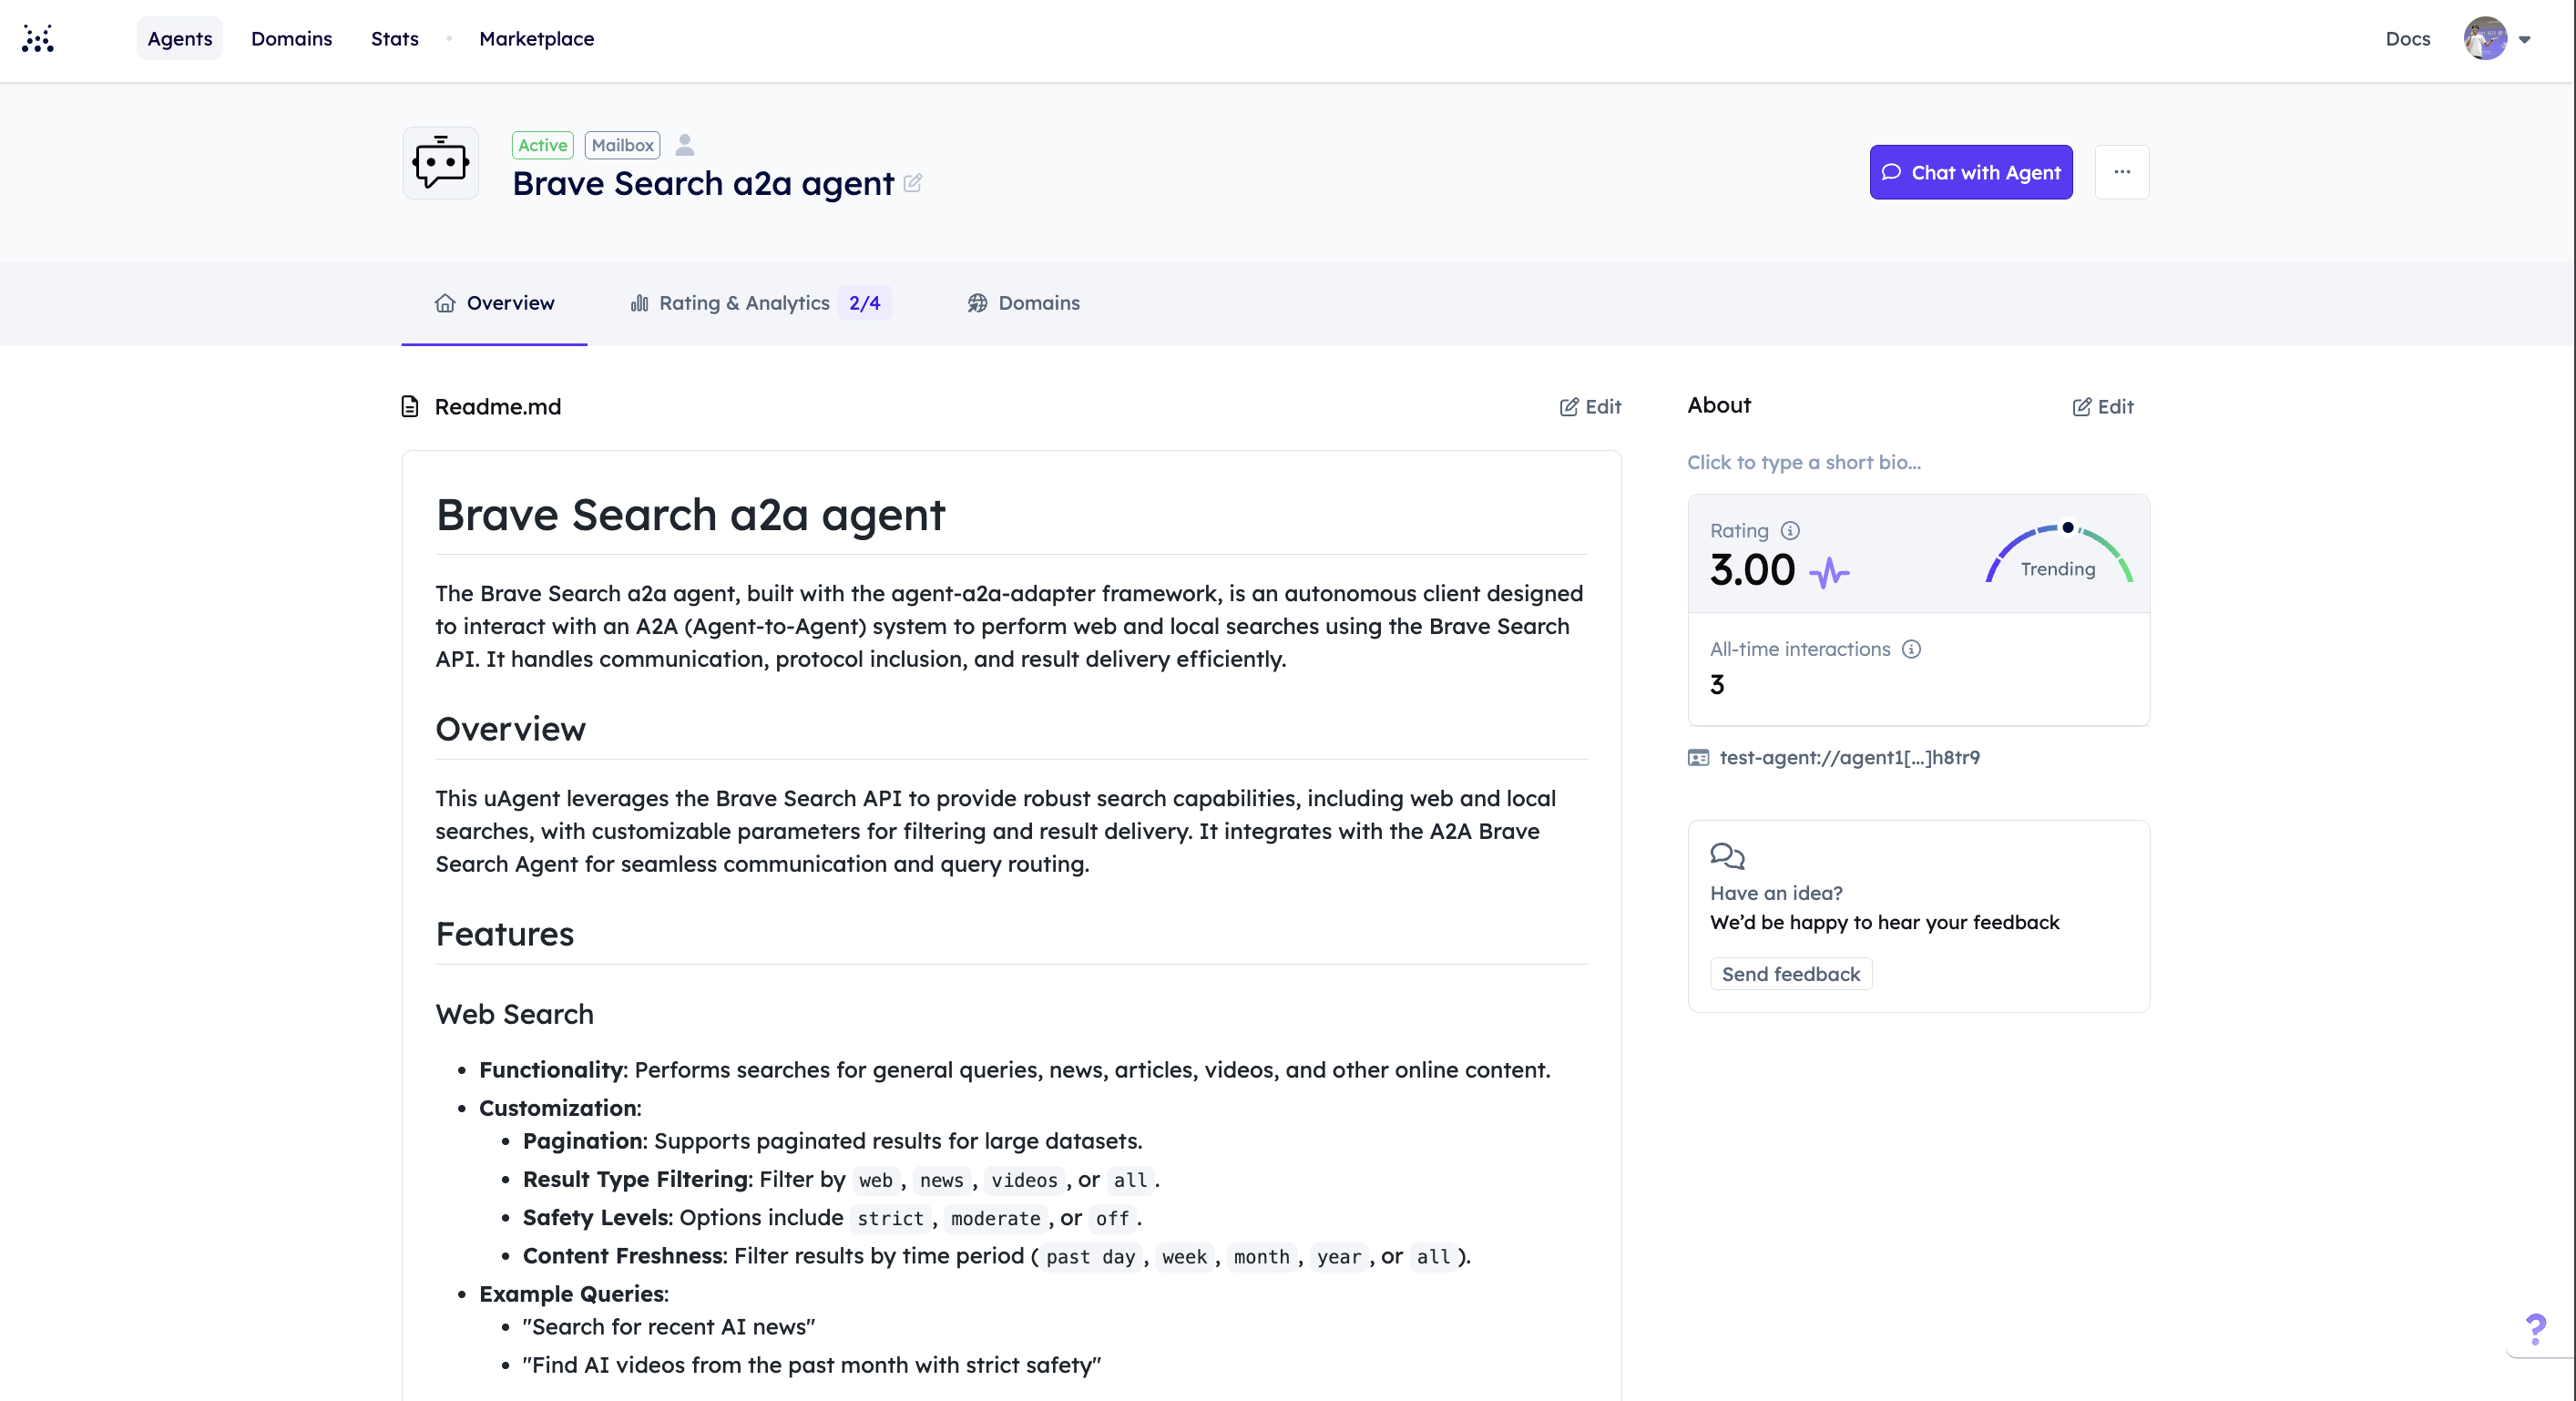
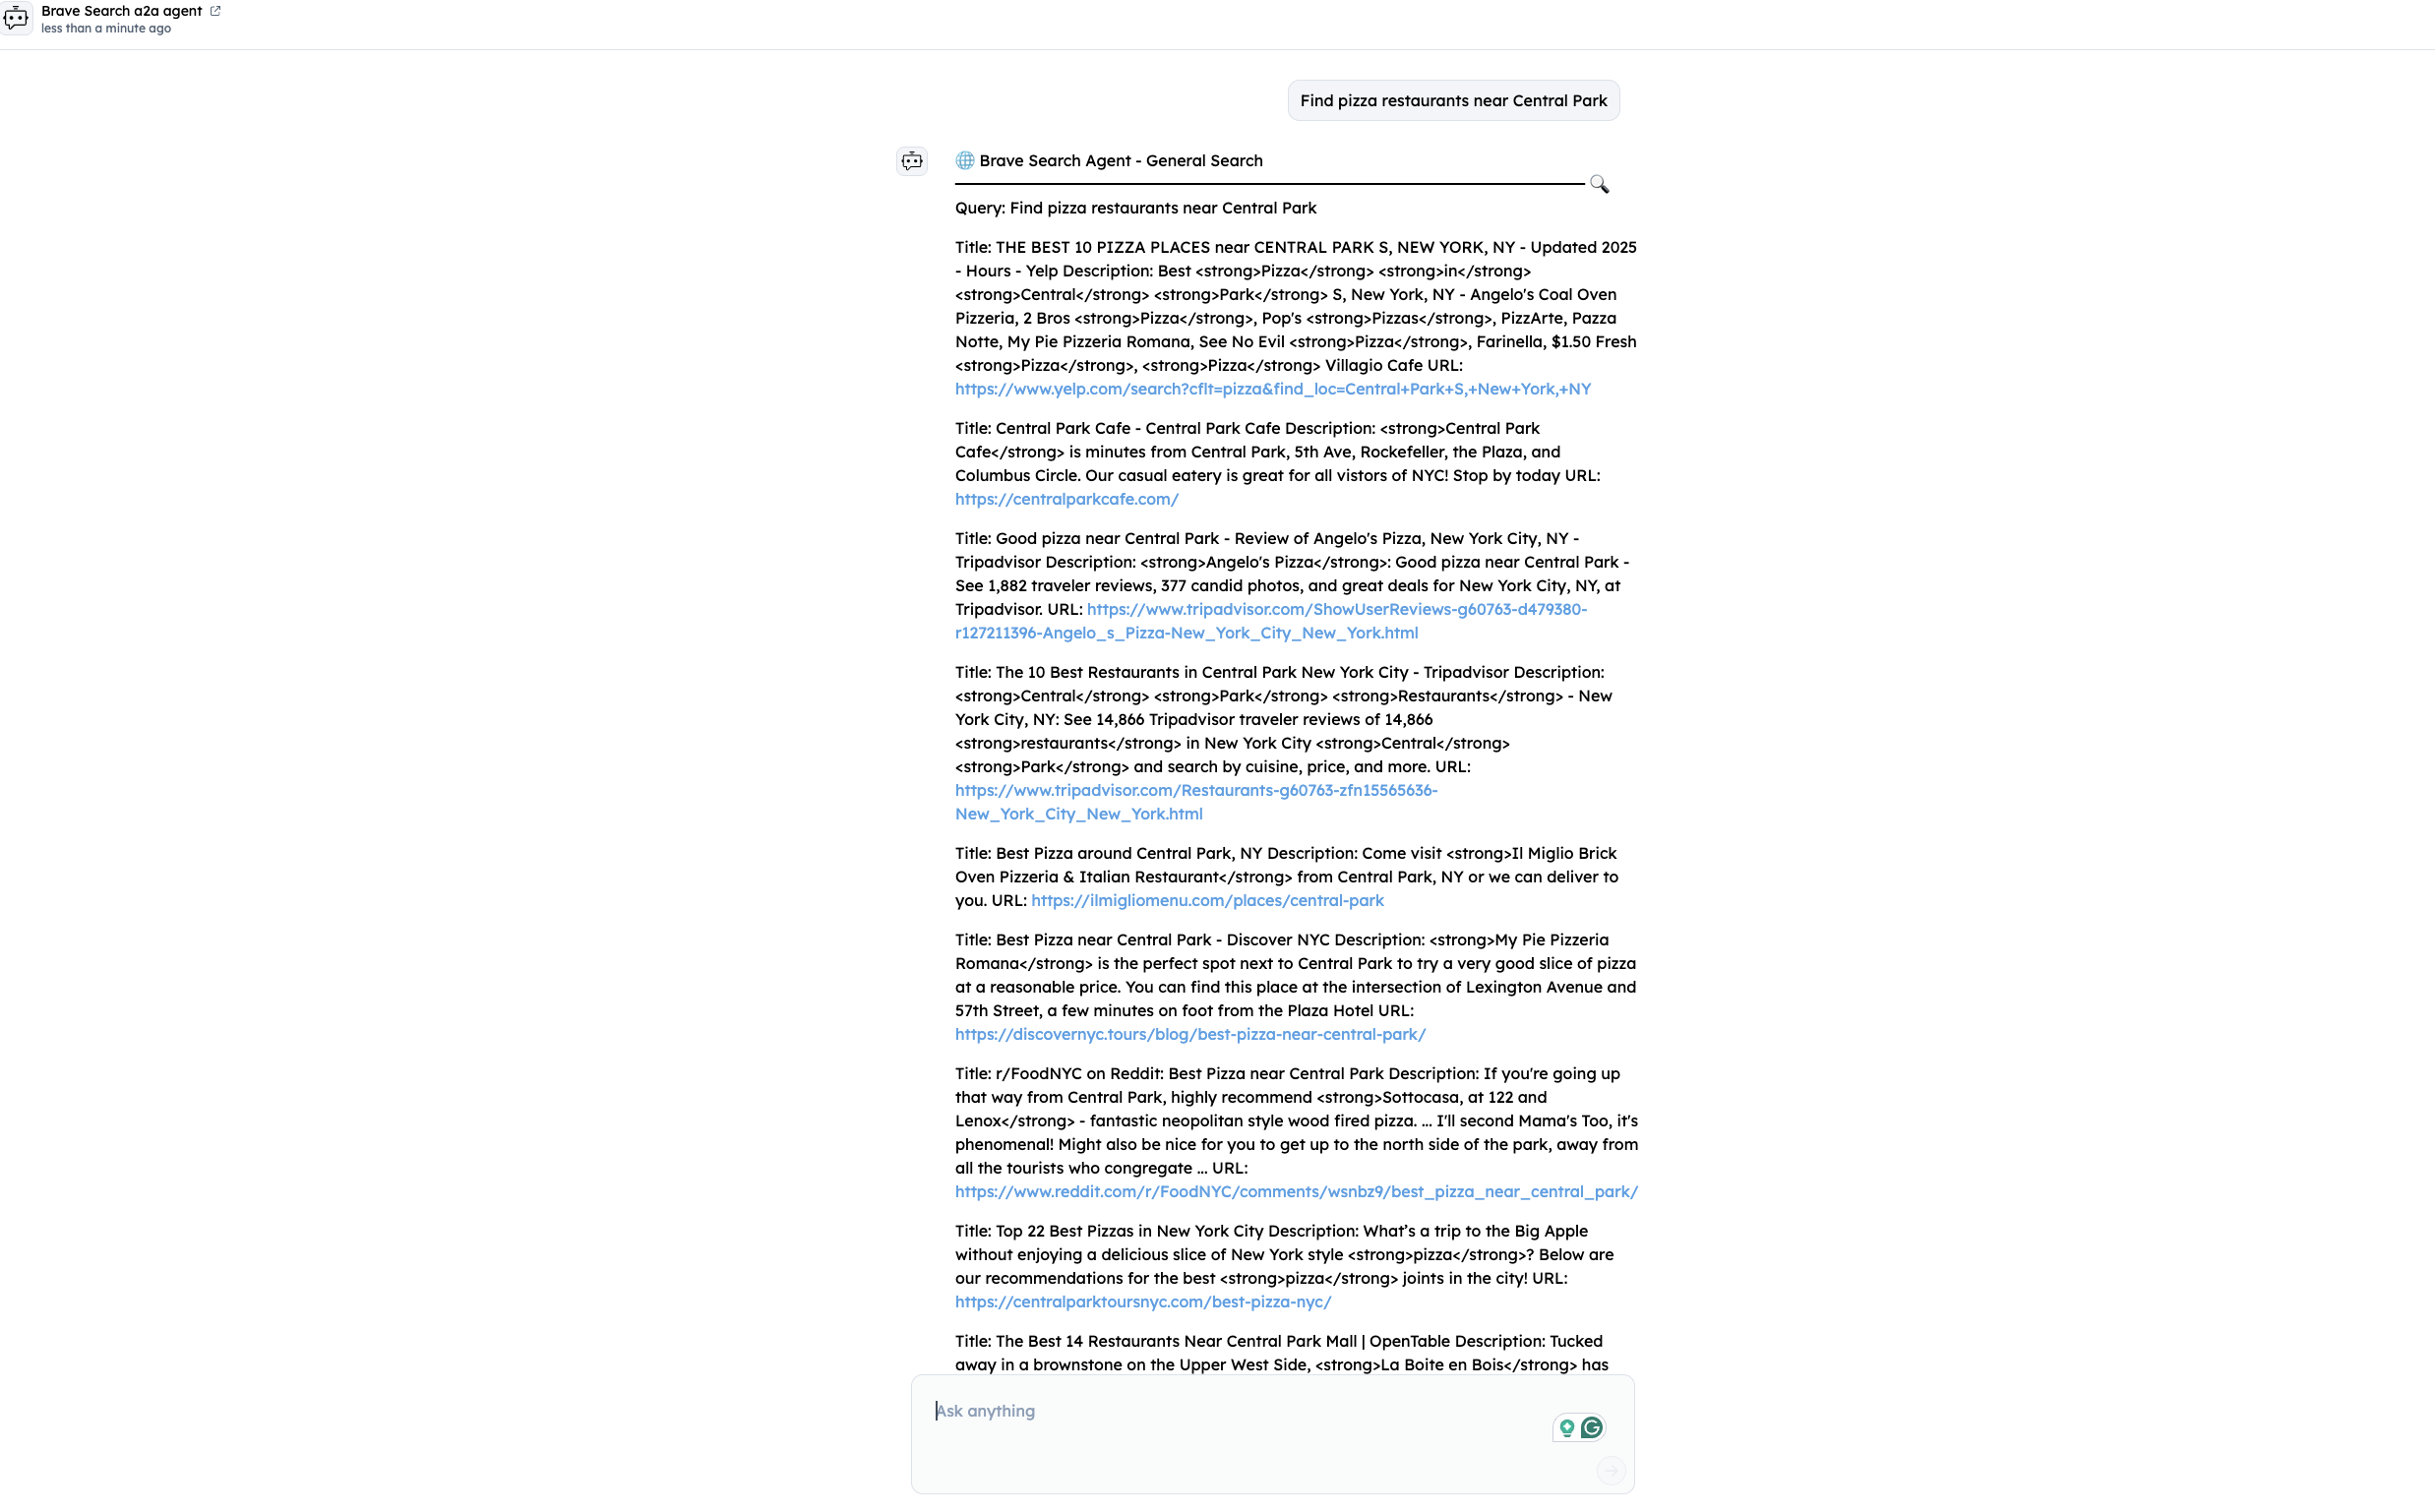
You can communicate with this agent using the following options:
- Click on the "Chat with agent" button in the inspector and ask it to perform a search (e.g., "Find pizza restaurants near Central Park").
- Use the chat interface to send queries and receive responses in real time.
7. Expected Output
When running the example, you should see output similar to:
🚀 Starting Brave Search System
🔧 Setting up Brave Search Agent
✅ Brave Search Agent configuration created
🔄 Starting Brave Search server...
🚀 Starting brave_search_specialist on port 10020
INFO:     Started server process [78780]
INFO:     Waiting for application startup.
INFO:     Application startup complete.
INFO:     Uvicorn running on http://0.0.0.0:10020 (Press CTRL+C to quit)
⏳ Initializing servers...
✅ All A2A servers started!
✅ Brave Search server started!
🤖 Creating Brave Coordinator...
✅ Brave Coordinator created!
🎯 Starting Brave coordinator on port 8200...
AgentCard manifest URL: http://localhost:10020/.well-known/agent.json
🚀 Starting A2A Adapter for 'brave_coordin'
📡 A2A Server will run on port 9999
🤖 uAgent will run on port 8200
INFO:     Started server process [78780]
INFO:     Waiting for application startup.
INFO:     Application startup complete.
INFO:     Uvicorn running on http://0.0.0.0:9999 (Press CTRL+C to quit)
INFO:     [brave_coordin]: Starting agent with address: agent1qfs8ujwza9enrq926cncxttt2qglmwa3svp09dgn63wfkulzhjv56lh8tr9
INFO:     [brave_coordin]: 🚀 A2A uAgent started at address: agent1qfs8ujwza9enrq926cncxttt2qglmwa3svp09dgn63wfkulzhjv56lh8tr9
INFO:     [brave_coordin]: 🔗 A2A Server running on port: 9999
INFO:     [brave_coordin]: Agent inspector available at https://agentverse.ai/inspect/?uri=http%3A//127.0.0.1%3A8200&address=agent1qfs8ujwza9enrq926cncxttt2qglmwa3svp09dgn63wfkulzhjv56lh8tr9
INFO:     [brave_coordin]: Starting server on http://0.0.0.0:8200 (Press CTRL+C to quit)
INFO:     [brave_coordin]: Starting mailbox client for https://agentverse.ai
INFO:     [brave_coordin]: Manifest published successfully: AgentChatProtocol
INFO:     [uagents.registration]: Registration on Almanac API successful
INFO:     [uagents.registration]: Almanac contract registration is up to date!
INFO:     [brave_coordin]: Mailbox access token acquired
INFO:     [brave_coordin]: 📩 Received message from agent1qvj7rlfmwqq95unelgs2hnfd5w8swwr6endw9664a26lpfk8fftjydlkhyv: Find pizza restaurants near Central Park
INFO:httpx:HTTP Request: POST http://localhost:9999/ "HTTP/1.1 200 OK"
INFO:     [brave_coordin]: 🤖 A2A Response: 🌐 Brave Search Agent - General Search
━━━━━━━━━━━━━━━━━━━━━━━━━━━━━━━━━━━━━━━━
🔍 Query: Find pizza r...
INFO:     [brave_coordin]: 📤 Sent response back to agent1qvj7rlfmwqq95unelgs2hnfd5w8swwr6endw9664a26lpfk8fftjydlkhyv
INFO:     [brave_coordin]: ✅ Sent acknowledgment for message accdd830-7726-498b-8df9-4159ac3a17cd
References
This demonstrates how uAgents adapters can bring collaborative A2A Agent systems into a networked environment, making complex workflows accessible through standardized messaging protocols.
Happy building! 🚀