Build a Node.js/Web Application with uAgent Client
This guide demonstrates how to integrate Fetch.ai uAgents into your Node.js or web applications using the uAgent Client library. We'll build a complete integration that enables seamless communication with uAgents from JavaScript/TypeScript applications.
Overview
The Node.js Client Integration provides:
- Node.js/TypeScript Library - Simple API for querying uAgents
- Automatic Bridge Management - Handles Python bridge agent automatically
- Per-User Isolation - Separate bridge agents for each user session
- Agentverse Integration - Automatic registration and discovery
- Production Ready - Battle-tested in real applications
- Modern Web Integration - Works with Next.js, React, and other frameworks
Prerequisites
Before you begin, ensure you have:
- Node.js 18+ installed
- Python 3.8+ installed (for bridge agent)
- Basic knowledge of JavaScript/TypeScript
- Agentverse Token (optional, for agent registration)
Installation
1. Install the Package
npm install uagent-client
2. Install Python Dependencies (Optional)
pip install uagents uagents-core requests
Architecture Overview
System Components
- Your Application - Node.js/Next.js/React application
- uAgent Client - JavaScript/TypeScript library
- Bridge Agent - Python bridge that handles protocol communication
- Target uAgent - The Fetch.ai agent you want to communicate with
System Workflow

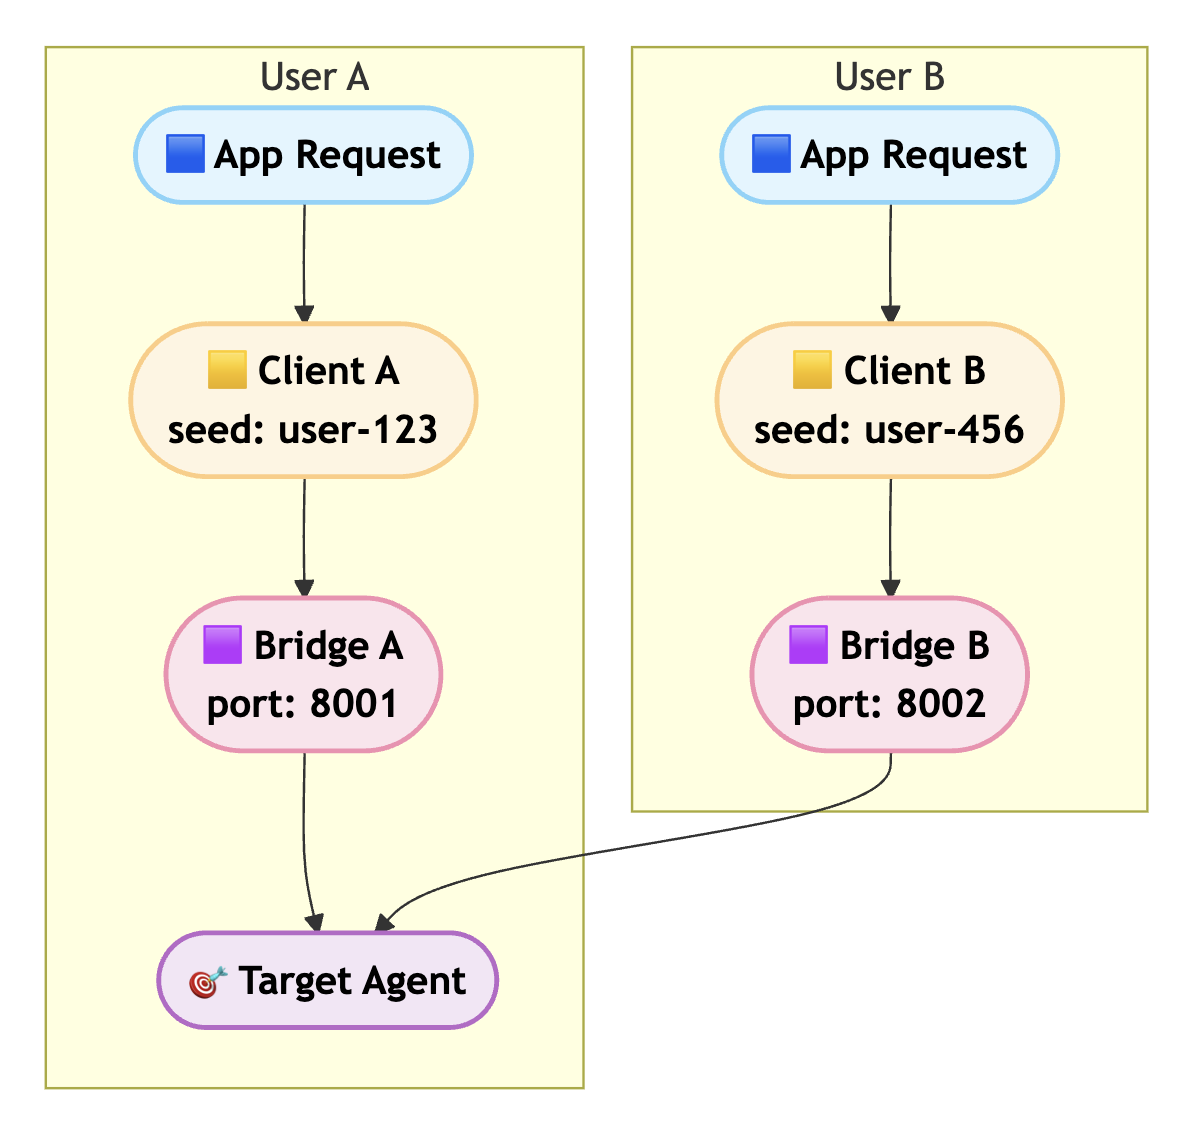
Per-User Isolation
Each user can have their own isolated bridge agent, providing separation and security:
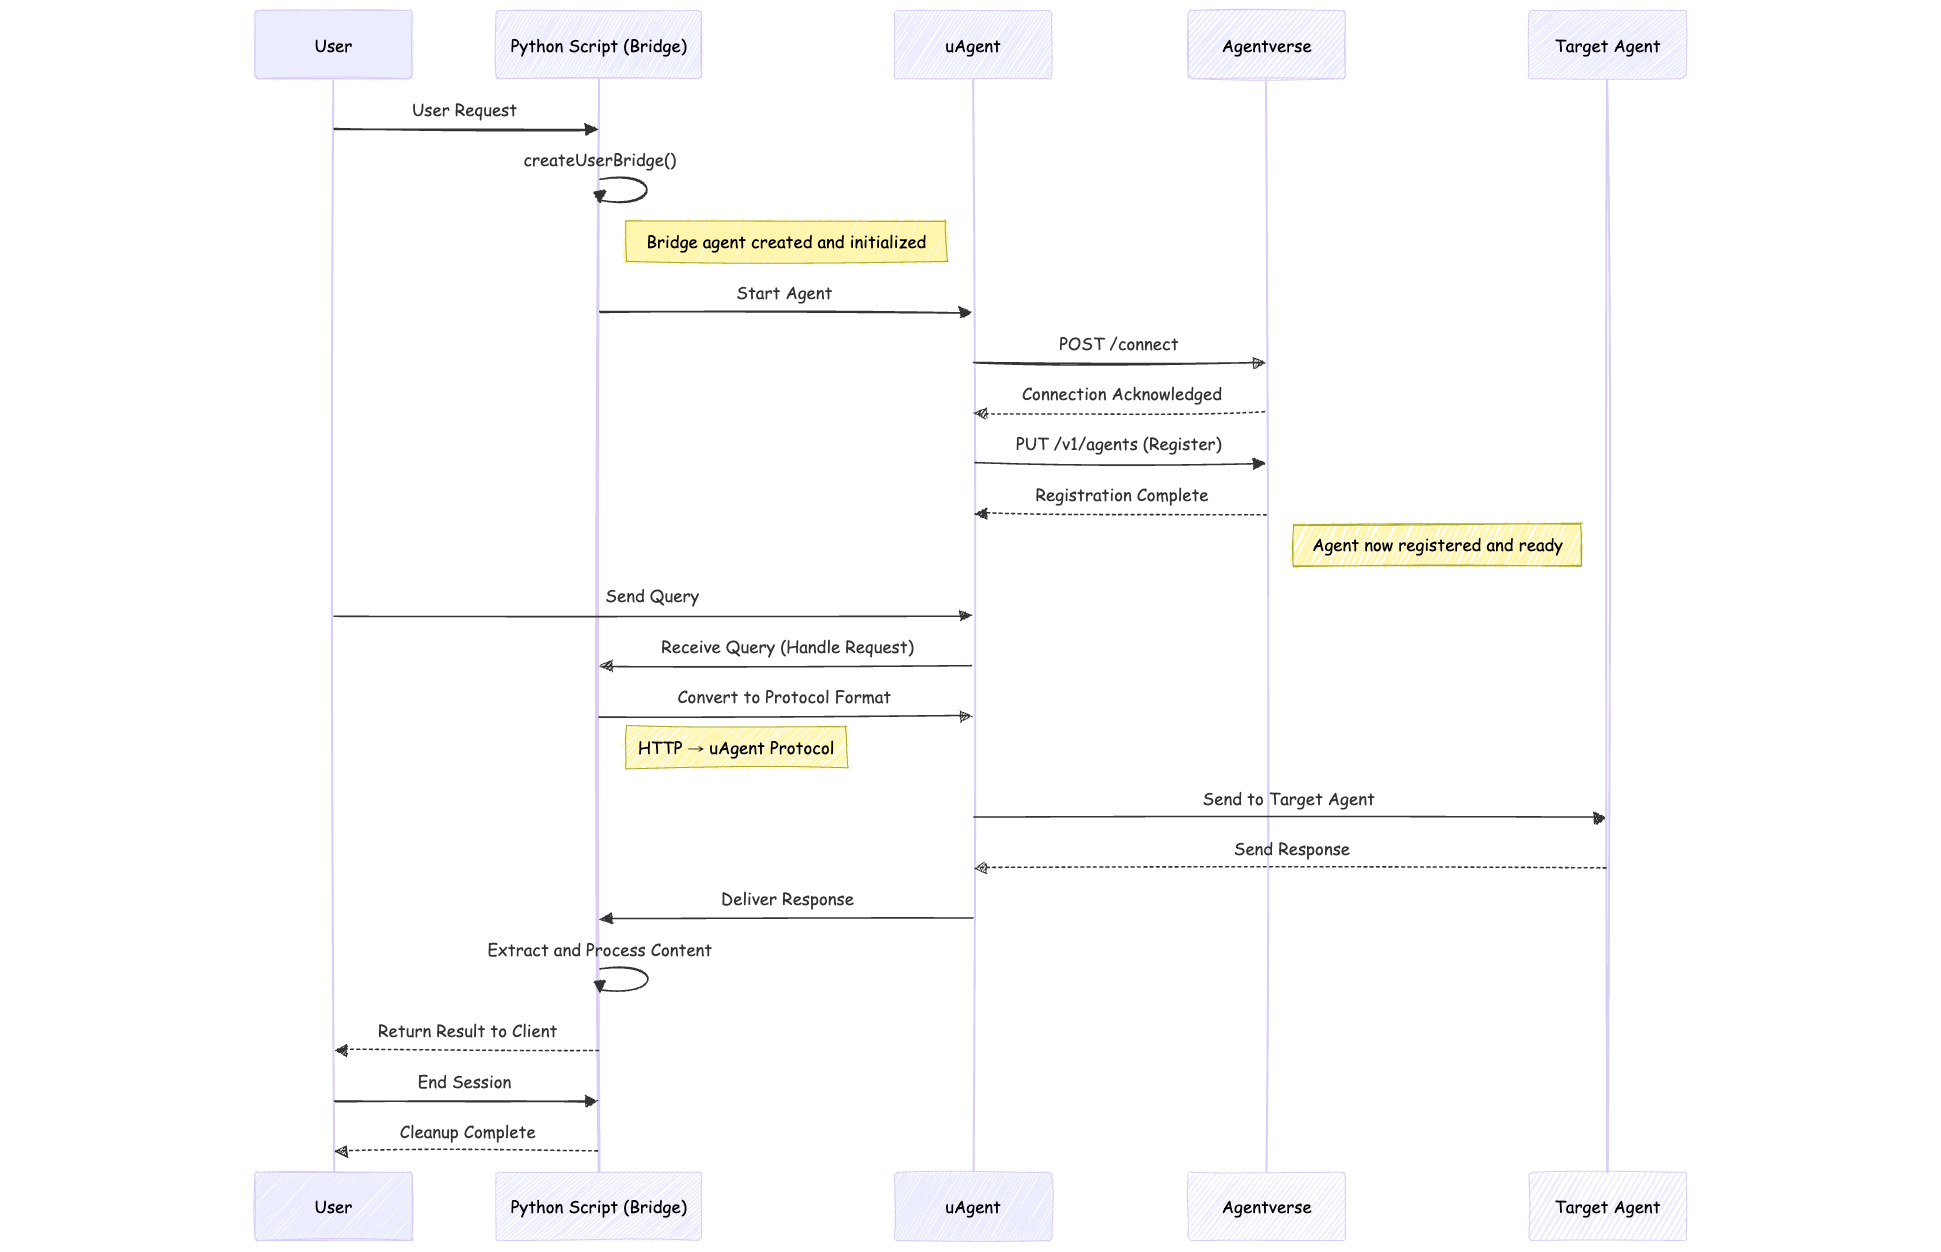
Complete Workflow Diagram
The complete lifecycle of a uAgent client session, showing the interaction between User, Python Script (Bridge), uAgent, Agentverse, and Target Agent:
Quick Start
JavaScript Example
const UAgentClient = require('uagent-client');

// Create client
const client = new UAgentClient();

// Query an agent
const result = await client.query(
    'agent1q2g97humd4d6mgmcg783s2dsncu8hn37r3sgglu6eqa6es07wk3xqlmmy4v',
    'Search for pizza restaurants in New York'
);

if (result.success) {
    console.log(result.response);
} else {
    console.error(result.error);
}
TypeScript Example
import UAgentClient from 'uagent-client';

// Create client
const client = new UAgentClient();

// Query an agent with type safety
const result = await client.query(
    'agent1q2g97humd4d6mgmcg783s2dsncu8hn37r3sgglu6eqa6es07wk3xqlmmy4v',
    'Search for pizza restaurants in New York'
);

if (result.success) {
    console.log(result.response);
} else {
    console.error(result.error);
}
Implementation Details
Basic Client Setup
The simplest way to use the client:
const UAgentClient = require('uagent-client');
const client = new UAgentClient();

async function chatWithAgent(message) {
    const result = await client.query(
        'your-agent-address-here',
        message
    );

    return result.success ? result.response : 'Error: ' + result.error;
}
Per-User Bridge Setup
Create isolated bridge agents for each user with Agentverse registration:
const UAgentClient = require('uagent-client');

// Create client with user-specific configuration
const client = new UAgentClient({
    userSeed: 'user-123',
    agentverseToken: 'your-bearer-token'
});

// Create per-user bridge
await client.createUserBridge('user-123', 'bearer-token');
Simple Method (Returns String Directly)
For simpler usage, use the ask method:
const client = new UAgentClient();

try {
    const response = await client.ask('agent_address', 'Your question');
    console.log(response); // Just the response string
} catch (error) {
    console.error('Failed:', error.message);
}
Production Implementation
Next.js API Route Example
Create a backend API route to handle agent queries:
// app/api/chat/route.ts
import { NextRequest, NextResponse } from 'next/server';

const UAGENT_ADDRESS = 'agent1qfaar64uhcx6ct3ufyerl7csaytwsezwxekeukrwp3667fg8nl05c9fmze7';
const AGENTVERSE_TOKEN = 'your-bearer-token-here';
const USER_SEED = 'gautam';

const clientInstances = new Map<string, any>();

async function getClient(seed: string, token: string) {
  if (!clientInstances.has(seed)) {
    const UAgentClientModule = await import('uagent-client');
    const UAgentClient = UAgentClientModule.default || UAgentClientModule;

    const config: any = {
      timeout: 60000,
      autoStartBridge: true,
      userSeed: seed,
      agentverseToken: token
    };

    const client = new (UAgentClient as any)(config);
    await client.createUserBridge(seed, token);

    clientInstances.set(seed, client);
    await new Promise(resolve => setTimeout(resolve, 3000));
  }

  return clientInstances.get(seed);
}

export async function POST(request: NextRequest) {
  try {
    const { message, userSeed, agentverseToken } = await request.json();

    if (!message || typeof message !== 'string') {
      return NextResponse.json({ error: 'Invalid message' }, { status: 400 });
    }

    const client = await getClient(
      userSeed || USER_SEED,
      agentverseToken || AGENTVERSE_TOKEN
    );

    const result = await client.query(UAGENT_ADDRESS, message);

    if (result.success) {
      return NextResponse.json({
        response: result.response,
        success: true
      });
    } else {
      return NextResponse.json({
        response: 'I apologize, but I was unable to process your request at this time.',
        success: false,
        error: result.error
      });
    }
  } catch (error) {
    return NextResponse.json(
      {
        response: 'An error occurred while processing your request.',
        error: error instanceof Error ? error.message : 'Unknown error'
      },
      { status: 500 }
    );
  }
}
Frontend Component Example
Create a React component to interact with the API:
// app/page.tsx
'use client';

import { useState } from 'react';

export default function Chat() {
    const [messages, setMessages] = useState([]);
    const [input, setInput] = useState('');
    const [loading, setLoading] = useState(false);

    const handleSubmit = async (e) => {
        e.preventDefault();
        if (!input.trim() || loading) return;

        const userMessage = input.trim();
        setInput('');
        setMessages(prev => [...prev, { role: 'user', content: userMessage }]);
        setLoading(true);

        try {
            const res = await fetch('/api/chat', {
                method: 'POST',
                headers: { 'Content-Type': 'application/json' },
                body: JSON.stringify({ message: userMessage })
            });

            const data = await res.json();

            setMessages(prev => [...prev, {
                role: 'agent',
                content: data.success ? data.response : 'Error: ' + data.error
            }]);
        } catch (error) {
            setMessages(prev => [...prev, {
                role: 'agent',
                content: 'Failed to get response'
            }]);
        } finally {
            setLoading(false);
        }
    };

    return (
        <div className="flex flex-col h-screen max-w-4xl mx-auto p-4">
            <h1 className="text-2xl font-bold mb-4">Chat with uAgent</h1>

            <div className="flex-1 overflow-y-auto space-y-4 mb-4">
                {messages.map((msg, i) => (
                    <div key={i} className={`p-4 rounded-lg ${
                        msg.role === 'user' ? 'bg-blue-100 ml-auto' : 'bg-gray-100'
                    }`}>
                        <p className="font-semibold mb-1">{msg.role === 'user' ? 'You' : 'Agent'}</p>
                        <p>{msg.content}</p>
                    </div>
                ))}
                {loading && <div className="text-gray-500">Agent is thinking...</div>}
            </div>

            <form onSubmit={handleSubmit} className="flex gap-2">
                <input
                    type="text"
                    value={input}
                    onChange={(e) => setInput(e.target.value)}
                    placeholder="Type your message..."
                    className="flex-1 p-3 border rounded-lg"
                    disabled={loading}
                />
                <button type="submit" disabled={loading || !input.trim()}
                    className="px-6 py-3 bg-blue-500 text-white rounded-lg hover:bg-blue-600 disabled:opacity-50">
                    Send
                </button>
            </form>
        </div>
    );
}
Configuration
Client Options
new UAgentClient({
    timeout?: number,           // Default: 35000ms
    bridgeUrl?: string,          // Default: 'http://localhost:8000'
    autoStartBridge?: boolean,   // Default: true
    userSeed?: string,           // For per-user bridges
    agentverseToken?: string     // For Agentverse registration
})
Environment Variables
Set these in your production environment:
USER_SEED=your-unique-seed
AGENTVERSE_TOKEN=your-bearer-token-from-agentverse.ai
UAGENT_ADDRESS=your-target-agent-address
Deployment
⚠️ Platform Compatibility
Not Supported:
- ❌ Vercel - Serverless platform, requires persistent Python processes
- ❌ Netlify - Serverless platform, requires backend services
- ❌ Other Serverless Platforms - This client needs persistent Python bridge processes
Recommended for Production:
- ✅ Docker - Container-based deployment
- ✅ Render - Full platform with Docker support
- ✅ AWS ECS/EC2 - Container and VM support
- ✅ Google Cloud Run/GKE - Container platforms
- ✅ DigitalOcean - App Platform or Droplets
- ✅ Railway - Supports persistent processes
Docker Deployment
# Dockerfile
FROM node:18-slim

WORKDIR /app

# Install system dependencies and create python symlink
RUN apt-get update && apt-get install -y \
    python3 python3-pip gcc g++ \
    && ln -s /usr/bin/python3 /usr/bin/python \
    && rm -rf /var/lib/apt/lists/*

# Copy package files first
COPY package*.json ./

# Install Node.js dependencies
RUN npm install

# Copy all project files
COPY . .

# Install Python dependencies from uagent-client
RUN pip3 install --no-cache-dir --break-system-packages --default-timeout=100 --retries 5 uagents uagents-core requests

# Expose Next.js port
EXPOSE 3000

# Start both the bridge agent and Next.js application
CMD ["sh", "-c", "if [ -f node_modules/uagent-client/bridge_agent.py ]; then python3 node_modules/uagent-client/bridge_agent.py & fi && npm run dev"]
API Reference
Methods
query(agentAddress, query, requestId?)
Send a query to an agent.
Returns:
{
    success: boolean,
    response?: string,   // Response if success
    error?: string,      // Error if failed
    requestId: string
}
ask(agentAddress, query)
Send a query and get only the response string. Throws error if fails.
Returns: Promise<string>
createUserBridge(seed, token, port?)
Create a per-user bridge agent with Agentverse registration.
const bridgeInfo = await client.createUserBridge(
    'user-123',           // Unique seed for user
    'bearer-token',       // Agentverse bearer token
    8001                  // Optional port
);
// Returns: { name, address, port, seed }
ping()
Check if client is ready.
Returns: Promise<boolean>
stopBridge()
Stop the client and cleanup.
Testing the Integration
1. Simple Query Test
const UAgentClient = require('uagent-client');
const client = new UAgentClient();

async function testQuery() {
    const result = await client.query(
        'agent_address_here',
        'Hello, can you help me?'
    );

    console.log('Success:', result.success);
    console.log('Response:', result.response);
}
2. Per-User Bridge Test
const UAgentClient = require('uagent-client');

async function testPerUserBridge() {
    const client = new UAgentClient({
        userSeed: 'test-user',
        agentverseToken: 'your-token'
    });

    await client.createUserBridge('test-user', 'your-token');

    const result = await client.query(
        'agent_address',
        'Test message'
    );

    console.log(result);
}
3. Error Handling Test
const client = new UAgentClient();

try {
    const response = await client.ask('invalid-agent', 'Test');
    console.log(response);
} catch (error) {
    console.error('Error caught:', error.message);
}
Key Features Demonstrated
1. Simple Integration
- Easy Setup - Just install and use
- Type Safe - Full TypeScript support
- Zero Config - Works out of the box
2. Bridge Management
- Automatic Setup - Handles Python bridge automatically
- Per-User Isolation - Separate bridges for each user
- Resource Management - Proper cleanup and lifecycle
3. Production Ready
- Error Handling - Comprehensive error responses
- Timeout Management - Configurable timeouts
- Connection Pooling - Reuse client instances
4. Agentverse Integration
- Automatic Registration - Bridge agents register automatically
- Discovery - Find and connect to agents
- Token Management - Secure token handling
Security Best Practices
⚠️ Never Expose Your Token!
Never expose your Agentverse token in the frontend!
// ❌ DON'T DO THIS
// Exposing token in client code
const token = 'bearer-token';

// ✅ DO THIS INSTEAD
// Keep token in backend API route
const AGENTVERSE_TOKEN = 'bearer-token'; // Only server-side
Best Practices
- ✅ Define configuration as constants at the top
- ✅ Keep tokens server-side only
- ✅ Reuse client instances across requests
- ✅ Handle errors gracefully
- ✅ Set appropriate timeouts
- ❌ Don't create new client for each request
- ❌ Don't expose tokens in frontend
Troubleshooting
"Failed to start"
Solution: Install Python and uagents:
python3 --version  # Should be 3.8+
pip install uagents uagents-core
"No response"
Possible causes:
- Agent is offline
- Wrong agent address
- Network issues
- Timeout too short
Solution: Increase timeout:
const client = new UAgentClient({ timeout: 120000 });
Bridge Creation Fails
Solution: Check your Python environment and token:
# Verify Python is installed
python --version

# Verify token is valid
# Get token from https://agentverse.ai
GitHub Repository
For the complete code and additional examples, visit the uAgent Client Repository.
This repository includes:
- ✅ Complete client library
- ✅ TypeScript definitions
- ✅ Production examples
- ✅ Docker configuration
- ✅ Comprehensive documentation
- ✅ Testing examples