Create-fetch-agent
create-fetch-agent is an open-source scaffolding CLI that generates a runnable Fetch.ai uAgents project in one command — with unique seeds pre-filled, ports assigned, the Agent Chat Protocol already wired in, a Python environment set up, and AI-editor context installed.
Instead of cloning a starter, hand-wiring the chat protocol, generating a seed, and fighting dependency setup, you answer a few prompts and get an agent that runs immediately and is ASI:One-ready. The only things left as TODO are the workflow functions where your logic goes.
From anywhere on your machine:
npx create-fetch-agent
This launches the interactive wizard. No global install, no config files.
Why use create-fetch-agent?
- Runnable in one command — the generated project starts with
make run; no manual seed, protocol, or environment wiring. - Chat protocol always wired — every generated agent publishes its chat protocol manifest on startup, so it's discoverable and chattable on ASI:One. This is the #1 thing builders forget, and it's done for you.
- Batteries included — pre-generated unique seeds, deterministic ports, a
Makefile, and a real dependency manifest for your package manager. - Multiple project shapes — a single agent, a chat agent, an ASI:One-routed multi-agent project, or a pay-to-use agent that charges in on-chain FET.
- AI-editor context built in — installs Fetch-skills context for Cursor, Claude Code, Google Antigravity, or
AGENTS.md, so your coding assistant extends the project correctly. - You own deployment — nothing is auto-deployed. The CLI prints honest, step-by-step guidance for connecting your agents to Agentverse when you're ready.
Who is it for?
create-fetch-agent is built for developers building on the Fetch.ai ecosystem — and especially for hackathon builders who want to skip setup and get an agent onto ASI:One fast. If you're writing uAgents, splitting work across multiple agents, or building a pay-to-use service, it gives you a correct, runnable starting point in seconds.
Quick Start
Running npm install create-fetch-agent only adds the package to node_modules — it does not launch the scaffolder. Always use npx create-fetch-agent (or npm create fetch-agent) to run it.
Pass a project name (or omit it and the wizard will ask):
npx create-fetch-agent my-agent
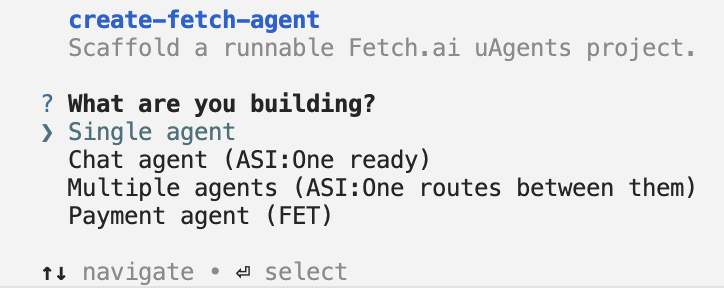
The wizard asks a few questions with arrow keys and Enter, then generates the project, installs your chosen AI-editor context, and (optionally) bootstraps the Python environment.
Build types
The first prompt — What are you building? — picks the shape of your project:
| Build type | What you get |
|---|---|
| Single agent | One self-contained, chat-enabled agent. |
| Chat agent (ASI:One ready) | A chat agent tuned to be discoverable and chattable on ASI:One out of the box. |
| Multiple agents (ASI:One routes between them) | Several independent expert agents — no orchestrator; ASI:One discovers and routes to each by its description. |
| Payment agent (FET) | A pay-to-use agent that charges in on-chain FET before running its paid action. |
See Build Types & Flags for the file layout and run commands for each shape.
The wizard, step by step
Step 1 — Choose your Python setup
Pick the package manager for the generated project. The CLI writes a real manifest for whichever you choose — a PEP 621 pyproject.toml for uv, a Poetry pyproject.toml, or a requirements.txt for pip — and a Makefile that uses the matching interpreter.
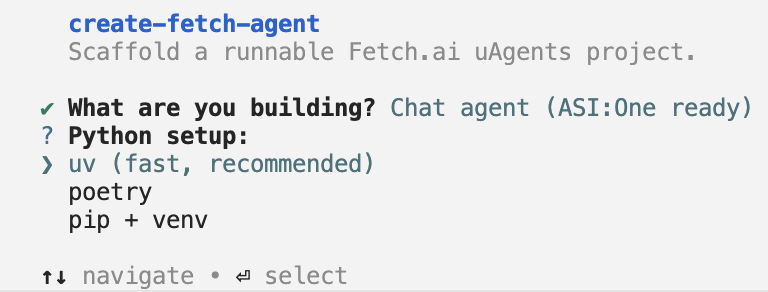
uv is the recommended default — it's fast and manages the virtual environment for you.
Step 2 — Add AI-editor context
Select any AI coding tools you use. The CLI installs Fetch-skills context into the generated project so your assistant knows the correct uAgents and protocol patterns. Use Space to toggle, Enter to confirm, or select nothing to skip.
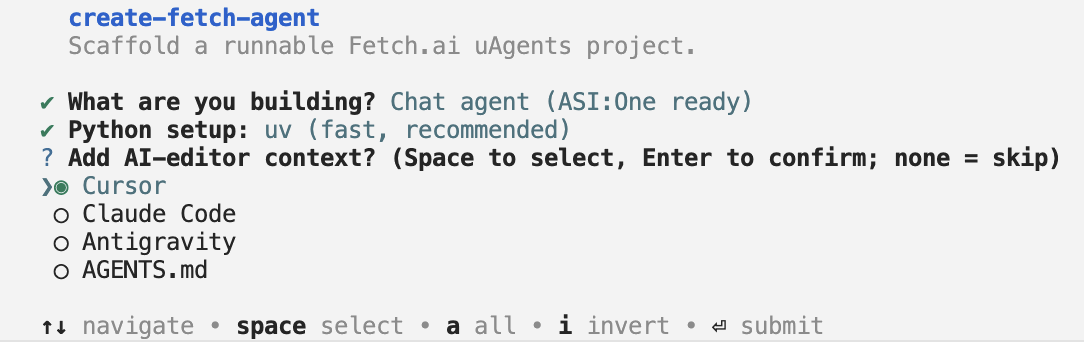
Step 3 — Connect on Agentverse
The last prompts let you install dependencies now and choose whether to see Agentverse steps immediately. create-fetch-agent never auto-deploys — instead it prints exactly how to connect your agent, and confirms the chat protocol is already wired for you.
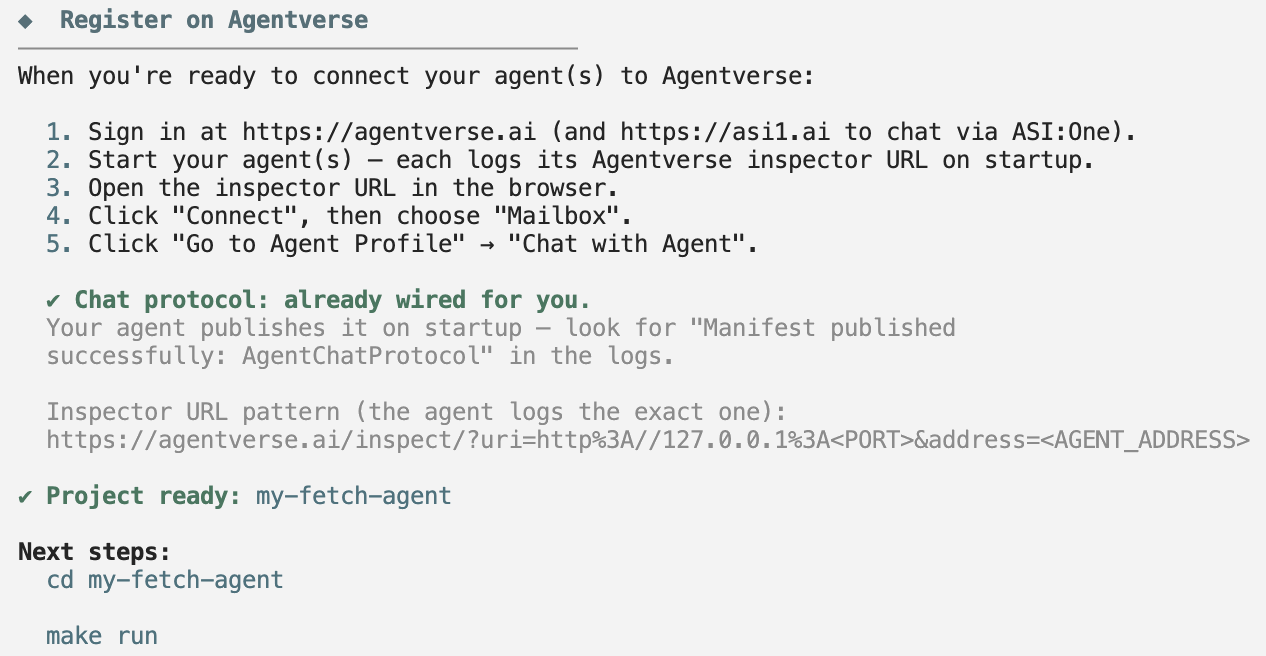
Run your agent
cd into the project and start it:
make run
The agent logs its address, publishes its chat protocol manifest, registers on the Almanac API, and prints an Agentverse inspector URL. Open that URL, click Connect → Mailbox, and your agent is live on ASI:One.

On startup you may see a not enough funds to register on Almanac contract warning. This is just the testnet faucet — it does not stop your agent from running or from being chattable. The Manifest published successfully: AgentChatProtocol and Registration on Almanac API successful lines are what matter.
Supported AI-editor targets
| Tool | Install path |
|---|---|
| Cursor | .cursor/skills/<skill>/SKILL.md |
| Claude Code | .claude/skills/<skill>/SKILL.md |
| Google Antigravity | .agent/skills/<skill>/SKILL.md |
| AGENTS.md / generic | AGENTS.md |
How create-fetch-agent uses fetch-skills
create-fetch-agent and Fetch-skills are complementary. create-fetch-agent generates a full, runnable project (code, seeds, ports, environment, protocols), and for the "AI-editor context" step it uses Fetch-skills under the hood to install the right SKILL.md files for your chosen tools.
| create-fetch-agent | Fetch-skills | |
|---|---|---|
| What it does | Scaffolds a runnable uAgents project and installs AI-editor context | Installs SKILL.md AI-editor context only |
| Output | Runnable code, seeds, ports, .env, Makefile, protocols | SKILL.md files (no code) |
| Best for | Starting a new agent project from zero | Adding Fetch.ai know-how to an existing (or any) project |
If you only want to add AI-editor context to an existing project — exactly what Fetch-skills does — create-fetch-agent can do that too, without scaffolding:
npx create-fetch-agent --skills-only --ai cursor,claude
Frequently Asked Questions
Do I need to install anything globally?
No. npx create-fetch-agent downloads and runs the latest version on demand.
Does it deploy my agent for me? No — by design. It generates a runnable project and prints the exact steps to connect on Agentverse. You stay in control of deployment.
Do I have to configure the chat protocol? No. Every generated agent already publishes its chat protocol manifest on startup, so it's ASI:One-ready out of the box.
Can I run it without answering prompts?
Yes. Pass flags such as --type, --python, and --ai for a non-interactive run. See Build Types & Flags.
Does the payment agent need API keys? No. The payment agent charges in on-chain FET and defaults to the stable-testnet with a self-funding wallet — there are no payment keys to configure.
Is create-fetch-agent free to use? Yes. create-fetch-agent is MIT licensed.
Links
- npm package: npmjs.com/package/create-fetch-agent
Related docs
- Build Types & Flags — every project shape and CLI flag in detail
- Fetch-skills — the AI-editor context installer create-fetch-agent uses
- uAgent Creation — how to build and run a uAgent
- Agent Chat Protocol — the protocol wired into every generated agent
- Agent Payment Protocol — the payment flow used by the payment agent
- Agentverse — the platform your agents deploy and discover on