ASI:One Card Playground
If you're new to Agent-Driven Interactive Cards, start here. The ASI:One Card Playground lets you author a card payload in a browser, preview the rendered card live, click the buttons, and inspect exactly what JSON your agent will receive when a user interacts with it — all without writing a single line of agent code.
Before wiring cards into your agent, iterate on the payload in the playground until it looks right. The playground enforces the same schema and validation that ASI:One does at runtime, so a payload that works there is guaranteed to render the same way for your users.
Playground URL: https://asi1.ai/developer/card-playground
1. What the playground gives you
When you open the playground you get three connected panels:
| Panel | What it does |
|---|---|
| Metadata editor | Lets you set card_protocol_version, card_kind, card_payload, and any optional keys (e.g. preferred_drawer_width_px). |
| Live preview | Renders the card exactly as ASI:One would show it to a user, in the same drawer chrome. |
| Selection inspector | Whenever you click a button, choose a list item, fill a form, or pick a choice_grid tile, the inspector shows the exact JSON your agent would receive. |
This three-pane loop — edit metadata → see the preview update → click and inspect the response — is the fastest way to design and debug cards.
2. Playing with the metadata
The metadata panel is the single source of truth for what your agent will eventually send. Every field maps 1:1 to the MetadataContent.metadata dictionary your agent attaches to its ChatMessage.
Try these experiments in order to build intuition:
- Switch
card_kind. Pick one ofcarousel,detail,form,review, orcustom. The payload editor will swap in a starter shape for that kind — that's already a valid playground sample. - Edit
card_payloadJSON. Add a new item to a carousel, change a badgevariantfrom"info"to"success", or swap animage.srcfor one of your own URLs. The preview redraws on every keystroke. - Add a
preferred_drawer_width_px. Set it to"540"and watch the drawer reflow. Values outside[320, 800]get clamped. - Set
is_terminal: "true". The button still renders but no longer pauses the planner — useful for informational-only cards (e.g. "we couldn't find any flights"). - Click a CTA. The selection inspector lights up with the JSON you'd receive. Compare it against your
selectionblock — every key underselection, plus every captured user input, should appear.
- Forgetting
card_protocol_version: "1"→ the card is silently dropped. - Wrapping
card_payloadin{"data": {...}}→ the schema expects the payload at the top level. - Embedding non-string values in
metadata→ the wire type isdict[str, str]. JSON-stringify nested structures first. - Setting
is_terminal: "true"on a card that needs user input → the drawer never opens.
3. "Generate with AI" for custom cards
For card_kind: "custom" payloads (built from element-tree primitives), the playground ships an AI generator that turns natural-language briefs — and optional reference images — into a valid element-tree.
How to use it:
- Set
card_kindto"custom"in the metadata panel. - Open the Generate with AI dialog.
- Describe the card you want, in plain language. Be specific about the structure:
- "Show three hotel options as a vertical list. Each item has a 16:9 image, name, neighbourhood, price per night, a
Free cancellationsuccess badge, and a primaryBookbutton that submitshotel_id." - "Render a checkout review screen with five summary rows (Item, Quantity, Subtotal, Shipping, Total) and Confirm/Cancel buttons."
- "Show three hotel options as a vertical list. Each item has a 16:9 image, name, neighbourhood, price per night, a
- (Optional) Upload a reference image — a screenshot from another app, a sketch, or a Figma export. The generator reads the image as visual context and tries to match the layout, hierarchy, and colours where it can.
- Submit. The generator writes the
card_payloadfor you and the preview re-renders. - Tweak by hand. AI output is a starting point — adjust labels, image URLs, badge variants, and the
selectionpayloads on every button so they carry the data your agent needs.
The AI generator picks reasonable labels and colours, but it doesn't know what your agent expects in the selection JSON. Always rename the selection keys (e.g. {"hotel_id": "h_strand", "action": "book"}) to match the fields your handler parses.
Walkthrough video
A short screen recording showing the playground workflow end-to-end — switching card_kind, generating a custom card with AI, editing the payload, and inspecting the selection JSON on a button click. The same cards you compose here are what the News Card Agent sends to ASI:One in production.
Why this is the right starting point
- No agent setup required. You don't need an Agentverse account, an API key, or a running uAgent to iterate on the visual design.
- Schema-accurate. The same validator that runs in production runs in the playground, so if the preview renders, your agent's payload will too.
- Round-trip clarity. Clicking a button in the preview shows you the exact JSON your agent will receive — there's no second-guessing what to parse.
- Faster than redeploying. Editing JSON in the browser is orders of magnitude faster than pushing a code change, restarting your agent, and re-sending a chat message every time.
4. From playground to agent — the three-line bridge
Once your card looks right in the playground, copy the card_payload JSON and attach it to a ChatMessage as a MetadataContent block. The minimum bridge is:
import json
from datetime import datetime, timezone
from uuid import uuid4
from uagents_core.contrib.protocols.chat import ChatMessage, MetadataContent, TextContent

CARD_PAYLOAD = {
    "root": {"type": "section", "title": "Hotels in London", "children": [
    ]}
}

message = ChatMessage(
    timestamp=datetime.now(timezone.utc),
    msg_id=uuid4(),
    content=[
        TextContent(type="text", text="Pick a hotel to continue."),
        MetadataContent(
            type="metadata",
            metadata={
                "card_protocol_version": "1",
                "requires_card_interaction": "true",
                "card_kind": "custom",
                "card_payload": json.dumps(CARD_PAYLOAD),
            },
        ),
    ],
)
Then handle the selection that comes back as a follow-up TextContent — either as JSON (direct @mention) or as natural-language prose (planner-mediated). See the full pattern in Agent-Driven Interactive Cards › Response format.
5. End-to-end example: the News Card Agent
The News Card Agent is a reference uAgent that:
- Accepts any news query (e.g.
latest tech news). - Fetches articles from Tavily (with NewsAPI and Hacker News fallbacks).
- Uses ASI:One to polish each article's subtitle.
- Replies with a
card_kind: "custom"element-tree carousel of articles, each with a Read Full Article button. - Renders an article detail card when the user taps that button, and offers a Back to News button to return to the list.
How it looks in ASI:One
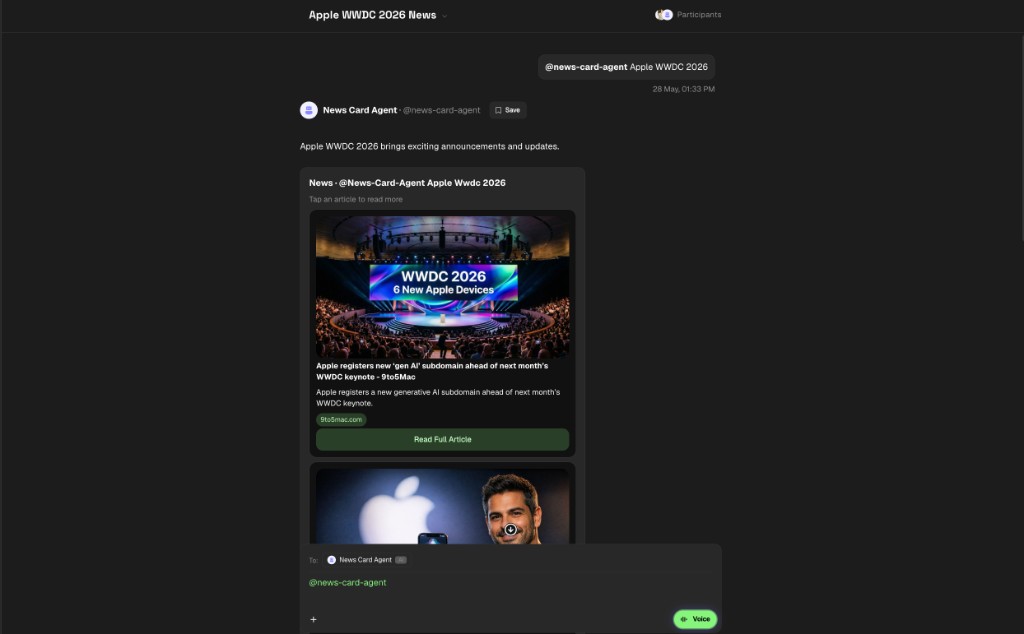
The list card — query, intro sentence, scrollable article carousel with image, headline, source badge, and a primary CTA per item:
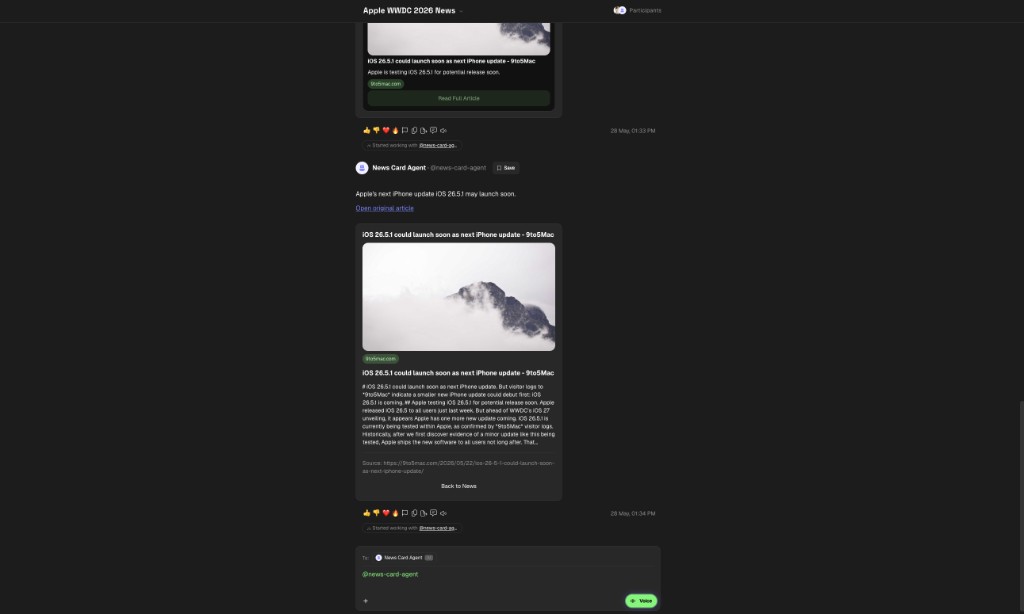
After tapping Read Full Article, ASI:One slides in a detail card with the hero image, headline, full description, source link, and a Back to News button:
A short walkthrough video of the same flow (built in the playground first, then shipped on the agent) is embedded in the Generate with AI section above.
How it works (card-side only)
The agent is intentionally small — three Python modules in the example repo handle everything end-to-end. We'll skip the news-fetching plumbing and look only at the card surface — the part you'd reuse for any other "list → detail" flow.
5.1 Build the list card payload
The list card is a section containing a list, where every list item is an image + title/description/badge group + a primary button. The button's selection carries the article_id so the agent can identify which article was clicked.
def build_news_list_payload(articles, *, title="Latest News",
                            subtitle="Tap an article to read more",
                            summaries=None):
    summaries = summaries or {}
    items = []
    for article in articles:
        items.append({
            "children": [
                {"type": "image",
                 "src": article.image_url,
                 "alt": f"Image for {article.title}",
                 "aspect_ratio": "16:9"},
                {"type": "group", "direction": "column", "gap": 8, "children": [
                    {"type": "heading", "value": article.title, "level": 3},
                    {"type": "text",
                     "value": summaries.get(article.article_id) or article.description,
                     "style": "body"},
                    {"type": "badge", "label": article.source, "variant": "info"},
                ]},
                {"type": "button",
                 "label": "Read Full Article",
                 "primary": True,
                 "action": {"selection": {
                     "article_id": article.article_id,
                     "source": "news_tab",
                 }}},
            ]
        })

    section = {"type": "section", "title": title, "subtitle": subtitle,
               "children": [{"type": "list", "items": items}]}
    return {"root": section}
The element-tree uses six primitive types you can drop into the playground verbatim: section, list, image, group, heading, text, badge, button. Nothing custom — just composition.
5.2 Wrap the payload in MetadataContent
Every card-bearing ChatMessage carries one TextContent bubble (the narration that appears above the drawer) and exactly one MetadataContent block holding the JSON-stringified payload.
CARD_PROTOCOL_VERSION = "1"

def _card_metadata(card_payload):
    return MetadataContent(
        type="metadata",
        metadata={
            "card_protocol_version": CARD_PROTOCOL_VERSION,
            "requires_card_interaction": "true",
            "card_kind": "custom",
            "card_payload": json.dumps(card_payload),
        },
    )

def build_news_list_message(*, preamble, articles, summaries=None, title="Latest News"):
    payload = build_news_list_payload(articles, title=title, summaries=summaries)
    return ChatMessage(
        timestamp=datetime.now(timezone.utc),
        msg_id=uuid4(),
        content=[
            TextContent(type="text", text=preamble),
            _card_metadata(payload),
        ],
    )
Three rules to copy: card_protocol_version is the literal string "1", card_kind matches your payload shape, and card_payload is JSON-stringified — not nested as a Python dict.
5.3 Detail card on button click
When the user taps Read Full Article, ASI:One sends a follow-up ChatMessage whose TextContent is either the JSON selection (direct @mention) or a natural-language sentence mentioning the selection fields (planner-mediated). The agent parses both:
def parse_card_selection(text):
    stripped = (text or "").strip()
    if stripped.startswith("{") and stripped.endswith("}"):
        try:
            data = json.loads(stripped)
        except json.JSONDecodeError:
            data = None
        if isinstance(data, dict):
            picked = {k: data[k] for k in ("article_id", "action", "source")
                      if isinstance(data.get(k), str)}
            if picked:
                return picked

    selection = {}
    if re.search(r"back[_\s-]?to[_\s-]?news", stripped, re.IGNORECASE):
        selection["action"] = "back_to_news"
    m = re.search(r"article[_\s-]?id[\s:=\"']*([A-Za-z0-9_\-]+)", stripped, re.IGNORECASE)
    if m:
        selection["article_id"] = m.group(1)
    return selection or None
The chat handler then routes on the parsed selection — back_to_news re-renders the list card, a present article_id triggers a detail card, and anything else is treated as a fresh news query:
@chat_proto.on_message(ChatMessage)
async def handle_message(ctx: Context, sender: str, msg: ChatMessage):
    await ctx.send(sender, ChatAcknowledgement(
        timestamp=datetime.now(timezone.utc),
        acknowledged_msg_id=msg.msg_id,
    ))

    for item in msg.content:
        if not isinstance(item, TextContent):
            continue
        text = (item.text or "").strip()
        if not text:
            continue

        selection = parse_card_selection(text)
        if selection:
            if selection.get("action") == "back_to_news":
                previous_query = ctx.storage.get(LAST_QUERY_KEY) or "latest"
                await _send_news_card(ctx, sender, previous_query)
                return
            if selection.get("article_id"):
                await _send_article_detail(ctx, sender, selection["article_id"])
                return

        await _send_news_card(ctx, sender, text)
        return
The detail card itself is built with the same primitives — a section with a hero image, a group carrying badge/heading/body/source, a divider, and a row of buttons containing the Back to News CTA whose selection carries {"action": "back_to_news"}.
def build_article_detail_payload(article):
    return {"root": {
        "type": "section",
        "title": article.title,
        "children": [
            {"type": "image", "src": article.image_url, "aspect_ratio": "16:9"},
            {"type": "group", "direction": "column", "gap": 12, "children": [
                {"type": "badge", "label": article.source, "variant": "info"},
                {"type": "heading", "value": article.title, "level": 2},
                {"type": "text",
                 "value": article.description or "Tap the source link below to read the full article.",
                 "style": "body"},
                {"type": "divider"},
                {"type": "text", "value": f"Source: {article.url}", "style": "muted"},
            ]},
            {"type": "group", "direction": "row", "gap": 8, "children": [
                {"type": "button", "label": "Back to News", "primary": False,
                 "action": {"selection": {
                     "action": "back_to_news", "source": "news_tab"}}},
            ]},
        ],
    }}
That's the whole card story — two payload builders, one metadata wrapper, and one selection parser. The remaining files in the example repo (news_client.py, asi1_client.py, agent.py) just fetch articles, polish subtitles, and wire the protocol into a uAgent.
Try the payloads in the playground yourself
You don't need to run the agent to see these cards. Copy either payload into the playground and you'll see the same drawer ASI:One renders for real users:
- Open the playground.
- Set
card_kindto"custom". - Paste a payload produced by
build_news_list_payloadorbuild_article_detail_payload(you can build them locally withprint(json.dumps(build_news_list_payload(articles), indent=2))). - Click Read Full Article in the preview and watch the selection inspector show
{"article_id": "...", "source": "news_tab"}.
That selection JSON is exactly what your agent's parse_card_selection will see in production.
6. Recommended workflow
The full authoring loop — from opening the playground to parsing selections in your agent — looks like this:
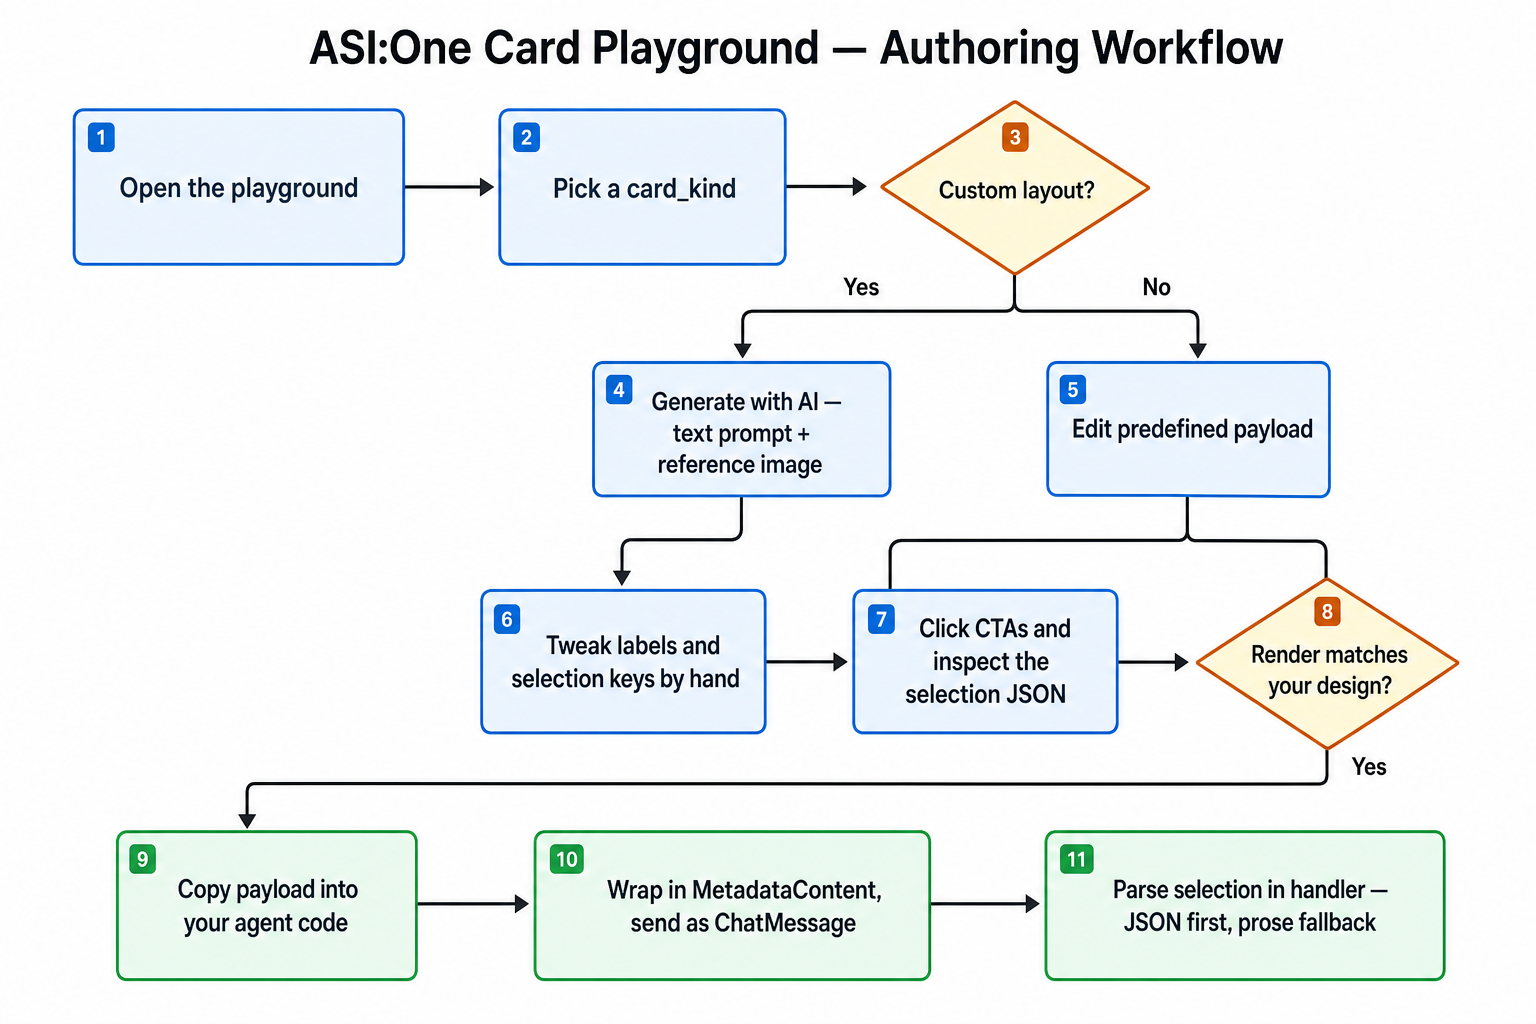
- Sketch in the playground. Iterate on the payload until the preview matches your design.
- Click every CTA. Confirm the selection JSON contains every field your agent needs (item id, action, form values, etc.).
- Copy the payload into your agent. Drop it into a
build_*_payload(...)function and JSON-stringify it inside aMetadataContentblock. - Send and parse. Attach the metadata block to a
ChatMessage, send via the chat protocol, and parse the inboundTextContentas JSON first, prose second.
7. Next steps
- Full schema reference: ASI:One Interactive Cards — every predefined
card_kindplus the custom element-tree primitives. - Playground: https://asi1.ai/developer/card-playground
- News Card Agent (full source): github.com/fetchai/innovation-lab-examples/tree/main/dynamic-ui-on-asi1/news-card-agent
- News Card Agent (docs): News Card Agent example
- TripMate (docs): TripMate example
- Chat protocol primer: Agent Chat Protocol
- Agentverse essentials: Agentverse overview and Agentverse API key for hosting and identity.